Wednesday, February 26, 2014

2014 Spring Cards are Here

I've been a busy bee in my studio lately, making over 50 new cards for my Zibbet shop.

I had just recently finished up an order of my sarcastic cards for Ventures, in Pike Place Market Seattle, and notice my inventory was very low on Arabic, Farsi, and Urdu cards.  For those that know my shop, I like to have a minimum of 300 items available, so to get down to the 220s is not normal.

I do appreciate every sale, don't get me wrong, but I do enjoy having a larger selection for my clients to shop from.  In fact, I was embarrassed to discover that I had one Urdu card in my whole shop.  One! 

Ya'lla, let's fix that.
Look for these to be listed in the next few days.

Saturday, February 22, 2014

Learning how to be a bronze artist

Yesterday I went with a group of docents from the Seattle Art Museum for a tour of the Classic Art Foundry in Seattle. 

This outing was offered to the docents that are currently touring Miro: the Experience of Seeing at SAM, in the hopes that we'd be able to understand the bronze process so loved by the artist in his later years.

Miro loved both the lost wax casting method, as well as welding pieces together, when he created assemblage sculpture.  A third method, sand casting, was also used by him, but is not as commonly used by modern artists.

Our tour was lead by the incredibly talented, soft spoken artist Joseph McDonnell. We stood outside the massive Foundry doors, smelling fish from the waters of the Salmon Bay behind our backs, as he told us stories of Italy, meeting a young Chihuly, and ice cube inspired masterpieces.

I wish I had written down more of his funny stories as he told them.

Joe currently has several pieces that the foundry is fabricating for him, including the 1000 pound brown sculpture, called Messenger, that you can see in the middle of the above photo.  This piece is being created for a private residence.  As it was the first thing we saw when we came in, we started our tour with a lesson about how a piece this size is bound together by welder Glen McCarthy.

We were told how welding the piece together isn't the biggest time consumer, it is actually the clean up afterwards that can take weeks, even months on a piece this size.  There are three separate grinders used, all with various degrees of textures, and even the smallest of bubbles, the size of a pin's head, can cause damage if not removed.

The patina process explained by Jonathan Kuzma was just as fascinating, as this particular client wanted the same coloring that Joe had used on a previous public art sculpture.  So getting the exact chemical combination is vital, because once the wax coating goes on the artwork, there is no going back.  Well, there is going back, for an added price :)

We entered a second part of the foundry where we were to learn about the lost wax casting.

Here the process of this centuries old tradition was patiently explained, and re-explainded, and re-explained, by Joe and Ion Onutan, the foundry owner. 

I'm pretty sure we all have the same confused look on our faces.
But it wasn't until we went into yet another smaller room, were samples of the process were all laid out at the table, that I could see the light bulbs finally flicker around all our heads.

The whole process, laid out in simple to understand steps!

Here you can see that Joe has created the exact piece, but on a much smaller scale, in an addition of 10.  This room is the wax room, while the room we had previously been in was the room where the molds were created.

This photo shows all the steps for this process:

A. Joe's carved wood model.
B. The model is covered with a brushed on rubber mold  which is held in place with a plaster mother mold. These when set will be cut in half and removed from the original model.
C. The plaster and rubber are put back together and wax is poured into the molds.  Here, the artist still has some leeway to make any corrections, additions or removals in the wax.
D. The piece then has a container added to the bottom, along with drainage holes for the air bubbles to escape, around the sides.  The bottom container will be used to hold the melted bronze after the piece has been invested.  The entire piece is then taken to a separate room (photos below) and dipped in a silica, then covered with a special sand.  The piece has to complete dry, before the process is begun the next day.  The process continues until a desired thickness is reached.
Once this ceramic shell is complete, the wax is melted out and bronze is poured into the mold.  The brick in front of this step in the photo is how the bronze is shipped to the Foundry.
E. These are examples of five of the ten art pieces that were created from this process.  They are all bronze, yet have different patinas and paint on them to make them unique.

We were taken into the investment room and shown the process by Ion.

Behind Ion were four large vats of sand.
Joe also explained the process of how an art piece is created, showing us the various molds he started with before he finally landed on one he liked.  He also told stories of working with clients and architects to ensure that their custom work would be compliant with safety regulations.

To make it perfect, you have to try, try and try again.
Here is a closer look at four of the completed miniatures, all available for purchase. 
 

The patinas on these in person are stunning!

Thank you Joseph McDonnell and Classic Art Foundry for expanding our knowledge of how bronze sculpture is made.  Now I feel ready to better explain the process on my tours on Sunday.

Please go to Amazon and buy his book!


Thursday, February 20, 2014

Kindergarten, 1st and 5th grade - cheetahs, owls, and blocking

My favorite day of the week is art day!  This day was made even greater by the fact that I was back to teaching art in the art/science room, so the kids can do what they do best while learning art: be messy!

Since I didn't have an art cart today, I was able to spread out my art supplies for the day and have everything handy for the 3 lessons.


(Just a side note to once again apologize to Mr. Vaugh for the floor situation left behind by little learning hands.  I cleaned up the best I could, but the tech people needed the room after me :-)

Kindergarten - Cheetah Collage
Objective - To give students the opportunity to practice their ripping skills and drawing large shapes.  Second, to practice using glue with toothpicks (not too much, not too little, just right). 

For the lesson today, we used white oil pastels on black construction paper to draw out a cheetah body.  We wanted to have the cheetah fill up the entire page, so we practiced a few times to get the body and head big big big. 

After we had the body outlined, the children were given two colors of yellow construction paper and shown how to rip it into stripes, and then smaller squares.  It was a lot of fun to see a room full of children being given permission to go crazy ripping paper.

Once the paper was ripped, I told them that artist sometimes use all kinds of devices to create art, such as a toothpick that can be found in their kitchen.  The kids were given dabs of glue and show how to use the toothpick as a "brush" to add it to the paper.

I also briefly mentioned positive and negative space, since we'll need to leave the black background paper showing in our cheetahs, to represent its spots.

Unfortunately, the kids did not finish their cheetahs, but the teacher has promised time in the afternoon for them to complete.  I will post some photos of the completed cheetahs as soon as I am able, but this is what they had done when they left art:


And here are some images of the cheetahs as they were being created


1st Grade - Owl Lead Painting
Objective - Drawing from teacher lead instruction.  Also recognizing the unique characteristics that define an owl. 

Since we did crazy looking animals last time, I wanted the children to have a lesson that was completely lead by guidance.  This gives them a chance to follow along with step by step instructions, in an easy to understand format (comparing body parts to shapes).  It also allows them the chance to create something that everyone else is also drawing, but still have it look unique.
For this lesson, I gave them five tempura paint colors (brown, black, yellow, gold, and blue) and taught them how to mix paints to get different shades.  Since I didn't include white, I didn't want to bring up tints, instead having them just look at the new colors that were mixed together.

We also talked about planning ahead and keeping your mixing circles on your plates very small, since you'll need room for all the different mixtures we'll be making.

Once they got their paper, brushes, and paper towels we were off!

We started by drawing an oval for the body, two circles for the eyes, a leaf for the wing(s), a big triangle for the back tail feathers, two small triangles for the legs, 3 C's at the end of each legs for claws and finally, a triangle for the beak.

The children were shown how to make the markings for the feathers in the middle, and a few had fun mixing up new colors that really showed originality.

Once the owls were done, the children were told to wipe off their brushes with the paper towel (no water needed, since we had stayed in a similar color range to this point)  and to paint the background blue.

I think we ended up with some gosh darn cute looking owls, if I do say so myself:


5th Grade - Block Letter Design
Objective - Students will focus on positive space by adding patterns and designs within the negative spaces between repeated block letters of their name.

Since we had learned about positive and negative space with our Leluja cutting from two weeks ago, today for the fifth graders I decided to reteach the lesson, but this time using block printing.   I think this lesson was easier for them to understand, now that they have grasped the concept of what positive/negative space is.
 
First we folded our 8 1/2 x 11 painting paper in half, then half again, continuing to do so until we had 16 squares.  The kids were told to start in the upper left hand and use oil pastels to draw each square for a letter in their name, repeating the same name until the last square. 
 
To create the look of the negative space, they could only pick one solid color for their letters, but were allowed free reign on any of the white space left behind.  They also had to fill up the entire square with a block letter, touching as much of the four corners of the square as possible, trying to make the letters blend into each other.
 
As usual, the fifth graders are the most talkative bunch I teach, so not all of them completed their work.  However, those that did finish, really got into their creations and did a great job:


Till next time, keep drawing!

Sunday, February 16, 2014

Miro: The Experience of Seeing tour starts today

Today marks the first day of my docent touring schedule at the Seattle Art Musuem for MirĂ³: The Experience of Seeing, showing until the end of May.

I have gone through months of training about this fascinating man and his work. 
Thank you to SAM for giving the docents catalogs to study!
I was first introduced to him as an undergrad getting a minor in art history at Oklahoma State, but I don't think I ever really knew much about him.  I had various prints of his on my walls over the years, and I went to his big exhibit in Washington DC, but I've never understood him.

Now I feel that if we had known each other, we would have sat to afternoon tea in his garden and talked for hours on surviving a dictator and human cruelty. 

I want him to know that I now see the difference in colors before and after you and your country have been set free. 

I want him to know that I now understand why he painted so many damn birds. 

I want to tell him about the continuation of destruction in his artwork, specifically his Joseph Royo tapestry at the World Trade Towers, a piece that I remember seeing in my childhood on a family vacation. 

I want to show him revolution graffiti from the youth artists of today, doing what he did on canvases years ago.  

SAM is showing a collection of paintings, mixed media, and assemblage sculpture and this is the only west coast viewing.  This exhibit has come directly from the Reina Sofia in Barcelona and showcases his work from 1963 and for the next 18 years.  It is astounding when you consider that he was creating them in his 70s, 80s, and up until his death on Christmas day, 1981.

Come and visit me on Sundays at 2:15pm so I can share his life, his inspirations, his dreams, and his love of creation with you.

If you can't make it on Sunday, please come another time.  You really shouldn't miss this master and his interpretation of his beautiful world around him.

Wednesday, February 12, 2014

A Crafty Arab at the airport

I just got some exciting news that Ventures, one of the stores that carries my products at Pike Place Market in Seattle, is opening up a new branch at SeaTac airport next week.

They have requested my line of Seattle buttons to sell in their new location.
A Crafty Arab 1 inch I Heart 'Seattle' Map buttons for Ventures at Pike Place Market
I dropped off a new set of Seattle themed magnets the store asked to see.  I hope they are picked up to also sell at the airport:
1 inch magnets with original designs
Now you can find my products at these locations:
AlSundus Boutique, Bellevue, WA
Arab American National Museum - Dearborn, MI
Byblos Mediterranean Grocery, Bellevue, WA
Fabric of Life Foundation, Everett, WA
FriendShop of Seattle Public Library, Seattle, WA
Goodies Mediterranean Market, Seattle, WA
Smithsonian Institute, Washington, DC
Ventures - Pike Place Market, Seattle, WA
Ventures - SeaTac Airport, SeaTac, WA

You can also find A Crafty Arab online
Amazon
Etsy
Zibbet < - - Where you'll see the most of my items

Thursday, February 6, 2014

Kindergarten, 1st and 5th grade - crayons, markers and scissors

Continuing my art teaching for Kindergarten, 1st Grade and 5th Grade at my daughters school, today's lessons couldn't use paint, water, or brushes because the art room was in use.   So I made up an Art Cart for the day, and went on my way!

Don't forget Friday is Spirit Day!
I had to be creative and come up with projects that primarily used crayons, scissors, pencils or other art supplies that weren't messy or couldn't fit on my cart.

Kindergarten - Drawing Small Flower Pots
Objective - Students will be looking at the lip, feet and size of flower pots to identify shapes and draw them from observation.

For the lesson today, I brought in small (3 or 4 inch) different looking flower pots and filled them with white daisy flowers.  I put one flower pot in the middle of each table that held 4 students. 

We talked first about proportions, because while the physical pots were very small, I wanted them to make their pots and flower fill their whole page.

I also asked them to use their imaginations and draw flowers that were different colors then the white daisies in the pots.  I showed them oversized flower paintings from Vincent Van Gogh, Georgia O'Keefe, and Frida Kahlo and talked about how many colors each artist used in their paintings.  Since we did Primary Colors last lesson, and pretty much stuck with one flower shape, I wanted to give them free range on their imagination.

Once everyone had their paper, we started by talking about all the different shapes of the pots that were in front of them, and how to make those shapes on our paper.  We traced out the lip first, then did our sides, and finally added the feet of our pot.

They went to work on their flowers alone and here are some of the end results.

None of our pots had handles, but this student added them.

A green pot with rainbow flower

This student made sure to also draw the table, just like in the Van Gogh.
 
1st Grade - Zany Imaginative Animals 
Objective - Recognizing and drawing the unique characteristics which define an animal.

Because we had drawn specifically from Andy Warhol's Soup Cans last time, this week the first graders got a chance to let their imaginations go wild...literally.

The critical part of the lesson I wanted them to leave with today was knowing how to identify characteristics of an animal and draw them well enough so that others can recognize what it is.  We talked about what is a characteristic and how can we identify the uniqueness of them on certain animals? 

I asked them what is the one thing that makes the giraffe different then any other animal?  Its neck!  What makes a lion different?  Its mane!  And an alligator?  Its jaws!  Well, what if you took all those animals and put them together to make one?

Yes, it would look like a very silly, zany, wacky thing, but would the person that is next to you be able to identify the different animals from the characteristics drawn?

Once each child had made their animal, they presented it to the class.  All their classmates raised their hands and had a chance to guessed 3 of the animals drawn.  Some students only did a few combinations, while other's creations had up to 7 heads and multiple body parts sticking out.

See if you can guess some of these animals from the characteristics drawn by our master artists:
Do you see an elephant trunk?  Lion's tail?  Cheetah body?  What else?

Do you see an elephant head?  Bee's body?  Cheetah legs?  What else?

Do you see an alligator head?  Chicken legs?  Stegosaurus spikes?  What else?


Do you see a zebra body?  Frog legs?  Bunny face?  What else?

5th Grade - Cutting Polish Leluja
Objective - Students learn about the Polish Wycinanki (pronounced vie-chee-non-key) art form, and more speciacially the Leluja (le-lu-ya), which is cut from a piece of paper folded lengthwise.

According to Wikipedia:
Wycinanki originated with Polish shepherds cutting designs out of tree bark and leather. Colorful wycinanki were pasted on furniture or roof beams as decoration, hung in windows, and given as gifts.

The primary lesson for today is to learn about symmetry and how to create it using positive and negative space.  And the fist step is to match up the corners perfectly, otherwise the fold will not be in the exact middle of the page.  Symmetry will not occur otherwise.

I showcased a few leluja designs from Poland so the kids would get layout ideas.  However, once they viewed the designs, I took down the images so that they would use their own imaginations and not imitate.

With perfectly folded paper, and fresh ideas, the kids took pencils and drew out their tree trunks on the fold.  I wanted them to use the tree as the central figure since it's easy to add branches and random designs to it's basic shape.

As a tip, I told them they could darken the areas of their paper that were the negative space, meaning they were going to be going away once all the cuts were done.  I also encouraged them to add animals to their trees, but not to add a lot of details to them since it would be hard to cut.

To be honest, despite the various samples I showed them, I only saw the light bulbs go off on this lesson once they cut their trees and opened up their designs.  It was then when most of the central fold cuts were added.

Once our Lelujas were  cut out, we glued them down to black construction paper and here are their results:
While this doesn't have a tree center, it still gets points for the stalactites and stalagmites.

Do you see the cat, looking up at the bird in the nest?

This tree of life is home to many, many birds.

This student put their tree in a frame.

The squirrels in the tree seems to be watching the sheep eat dinner.
Till next time, keep drawing!

Sunday, February 2, 2014

Spray Chalk Recipe

I can't quite take credit for creating today's craft, but I just couldn't resist sharing how adorable my kid was for doing it.

While I was inside my studio designing a custom order, my daughter, who is 10, decided to entertain herself by flipping though the hundreds of craft books we have laying around.  Okay, maybe hundreds is an exaggeration, but within sight of my laptop right now, I see three, so it might be close, considering how many rooms we have to make art in our home.

She found a recipe for washable spray chalk and got to work producing it in green and blue.   She then went outside and created this in honor of the Seahawks playing in the Super Bowl today.


Detail of the exclamation point.

Supplies:
4 tablespoons cornstarch
1 cup warm water
4-6 drops food coloring
1 small plant mister (or spray gun in her case)

Mix everything together in a medium bowl.  It'll get sticky and hard to mix, but just keep going. Pour it into your mister or spray gun.  Shake and spray.
 
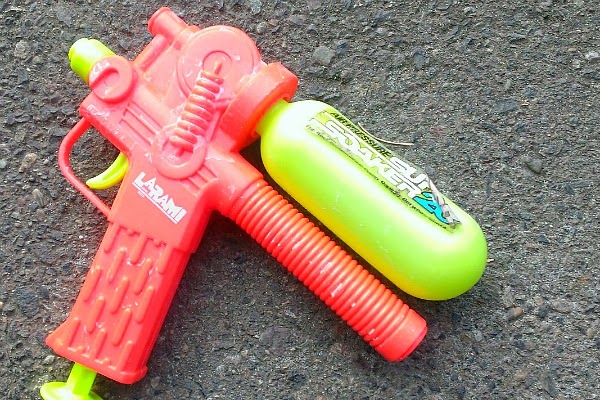
Old spray gun found in the depths of the garage.
Here are her tips:
Clean up the huge mess in your kitchen before your mom sees it.
Shake the mister/spray gun as you are using it so the cornstarch doesn't get clogged up.
Clean the kitchen before you go outside to spray so that your mom can't understand why her kitchen has yet again turned into a chemistry lab and then calls you in half way through since she has to make lunch and then you have to come in and explain it all.

Wouldn't this spray chalk be a fabulous way to decorate the parking lot outside of a Eid party?  Since it's washable, all of it can be hosed off afterwards!

We'll just wait for the Seattle rain to wash ours away.